On this page
Bitbucket Cloud
This page covers how to configure Pipelines-as-Code with Bitbucket Cloud through a webhook. Use this method to run Tekton pipelines triggered by pull requests and push events on repositories hosted on bitbucket.org.
Prerequisites
- A running Pipelines-as-Code installation
- A Bitbucket Cloud scoped API token (see below)
- The public URL of your Pipelines-as-Code controller route or ingress endpoint
Create a Bitbucket Cloud API token
Bitbucket Cloud app passwords are deprecated. Use a scoped API token for new setups and rotate existing app passwords to API tokens.
Follow the Bitbucket Cloud API token guide to create an API token with scopes. Select Bitbucket as the app when creating the token.
Check these boxes to add the permissions to the token:
- read:workspace:bitbucket
- read:pullrequest:bitbucket
- read:repository:bitbucket
- write:repository:bitbucket
- write:webhook:bitbucket
Store the generated token in a safe place. Bitbucket Cloud shows it only once.
Webhook Configuration using the CLI
Use the tkn pac create repo command to
configure a webhook and create the Repository CR in one step.
You need a scoped Bitbucket Cloud API token. tkn pac uses this token to
configure the webhook and stores it in a secret in the cluster, which the
Pipelines-as-Code controller uses for accessing the repository.
Below is the sample format for tkn pac create repo
$ tkn pac create repo

? Enter the Git repository url (default: https://bitbucket.org/workspace/repo):
? Please enter the namespace where the pipeline should run (default: repo-pipelines):
! Namespace repo-pipelines is not found
? Would you like me to create the namespace repo-pipelines? Yes
✓ Repository workspace-repo has been created in repo-pipelines namespace
✓ Setting up Bitbucket Webhook for Repository https://bitbucket.org/workspace/repo
? Please enter your Bitbucket Cloud Atlassian account email:  <[email protected]>
ℹ ️You now need to create a Bitbucket Cloud API token with scopes, please checkout the docs at https://support.atlassian.com/bitbucket-cloud/docs/create-an-api-token/ for the required permissions
? Please enter the Bitbucket Cloud API token:  ************************************
👀 I have detected a controller url: https://pipelines-as-code-controller-openshift-pipelines.apps.awscl2.aws.ospqa.com
? Do you want me to use it? Yes
✓ Webhook has been created on repository workspace/repo
🔑 Webhook Secret workspace-repo has been created in the repo-pipelines namespace.
🔑 Repository CR workspace-repo has been updated with webhook secret in the repo-pipelines namespace
ℹ Directory .tekton has been created.
✓ A basic template has been created in /home/Go/src/bitbucket/repo/.tekton/pipelinerun.yaml, feel free to customize it.
ℹ You can test your pipeline by pushing the generated template to your git repository
Webhook Configuration (Manual)
If you prefer to configure the webhook yourself, follow these steps.
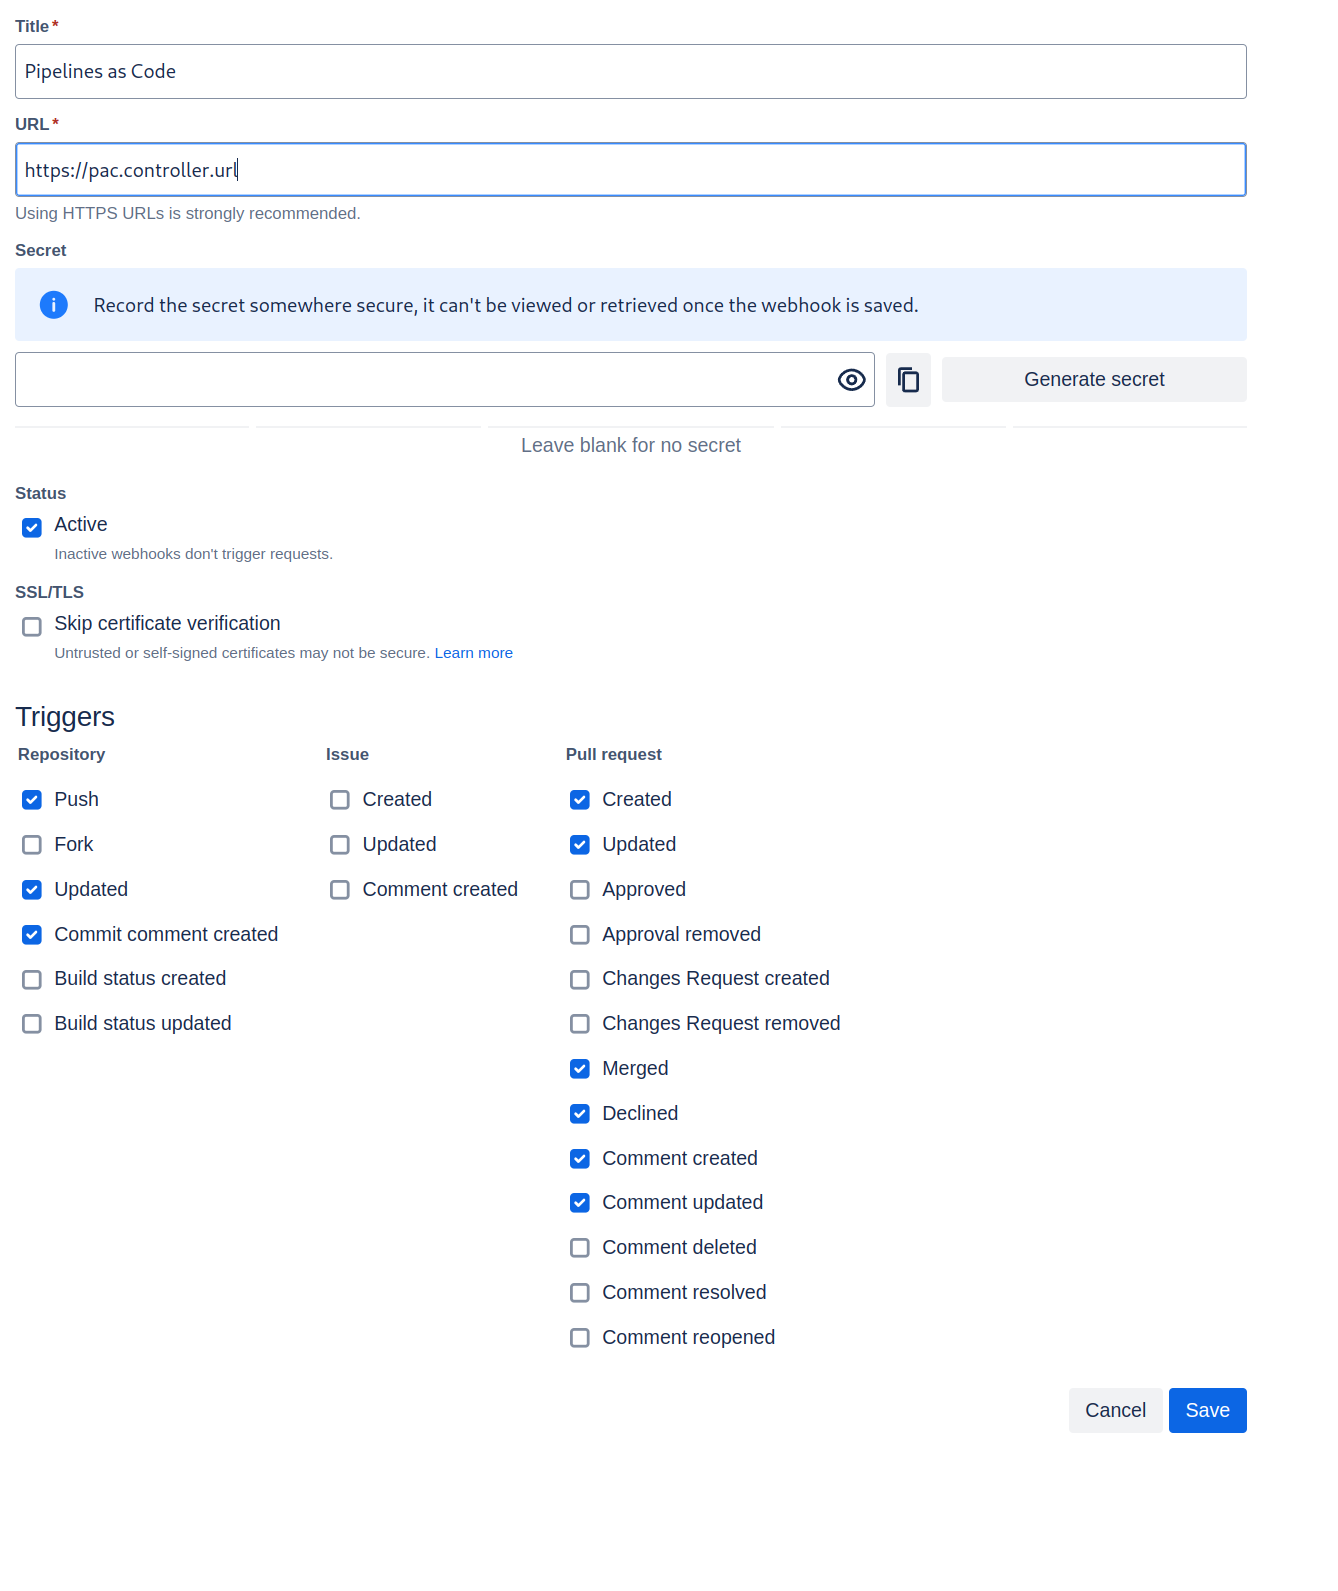
From the left navigation pane of your Bitbucket Cloud repository, go to Repository settings –> Webhooks tab and click on the Add webhook button.
Set a Title (i.e: Pipelines-as-Code)
Set the URL to the Pipelines-as-Code controller public URL. On OpenShift, get the public URL of the Pipelines-as-Code controller like this:
echo https://$(oc get route -n pipelines-as-code pipelines-as-code-controller -o jsonpath='{.spec.host}')The individual events to select are:
- Repository -> Push
- Repository -> Updated
- Repository -> Commit comment created
- Pull Request -> Created
- Pull Request -> Updated
- Pull Request -> Merged
- Pull Request -> Declined
- Pull Request -> Comment created
- Pull Request -> Comment updated
Refer to this screenshot to verify you have properly configured the webhook.
- Click on Save.
Create the Secret
Create a Kubernetes secret containing your API token in the target-namespace
(the namespace where your pipeline CI runs):
kubectl -n target-namespace create secret generic bitbucket-cloud-token \
        --from-literal provider.token="BITBUCKET_CLOUD_API_TOKEN" \
        --from-literal webhook.secret="YOUR_WEBHOOK_SECRET" # required when IP-Based validation is disabled in pipelines-as-code configmap.
Create the Repository CR
Create a Repository CR with the secret and webhook secret fields referencing it:
  ---
  apiVersion: "pipelinesascode.tekton.dev/v1alpha1"
  kind: Repository
  metadata:
    name: my-repo
    namespace: target-namespace
  spec:
    url: "https://bitbucket.com/workspace/repo"
    git_provider:
      user: "your_atlassian_account_email"
      secret:
        name: "bitbucket-cloud-token"
        # Set this if you have a different key in your secret
        # key: "provider.token"
      webhook_secret:
        # required when IP-Based validation is disabled in pipelines-as-code configmap.
        name: "bitbucket-cloud-token"
        # Set this if you have a different key in your secret
        # key: "webhook.secret"
You must use your Bitbucket/Atlassian account email address in the user field
of the Repository CR. Pipelines-as-Code uses this value with the API token for
Bitbucket Cloud API authentication. To find your email address, click on your
profile icon at the top-left corner in the Bitbucket Cloud UI (see image
below), go to Account Settings, and scroll down to locate your email
address.

Notes
The
git_provider.secretkey cannot reference a secret in another namespace. Pipelines-as-Code always assumes it is in the same namespace where the Repository CR has been created.The
tkn pac createandtkn pac bootstrapcommands are not supported on Bitbucket Cloud.
You can only reference a user by the ACCOUNT_ID in a owner file. For reason see here:
IP-based validation (defense-in-depth)
Pipelines-as-Code verifies that webhooks originate from Bitbucket Cloud IP addresses by fetching the IP list from https://ip-ranges.atlassian.com/.
To add extra IP addresses or networks, set the
bitbucket-cloud-additional-source-ipkey in thepipelines-as-codeConfigMap. You can add multiple networks or IPs separated by a comma.To disable IP checking, set
bitbucket-cloud-check-source-iptofalsein thepipelines-as-codeConfigMap.
Webhook Secret Validation
In addition to IP-based validation, Pipelines-as-Code can also verify Bitbucket Cloud supports HMAC webhook secrets. When you configure a webhook secret on the Repository CR, Pipelines-as-Code validates the signature header on every incoming webhook to verify the payload was sent by Bitbucket Cloud and has not been tampered with.
Note: If IP-Based validation is disabled, Pipelines-as-Code falls back to webhook secret validation to protect PipelineRuns being triggered from unverified source.
Pipelines-as-Code checks the X-Hub-Signature-256 header (HMAC-SHA256)
first and falls back to X-Hub-Signature (HMAC-SHA1) if the SHA256 header
is not present.
Make sure the same secret value is configured in your Bitbucket Cloud webhook settings under Repository settings → Workflow → Webhooks → Edit → Secret.
Add Webhook Secret
If the webhook secret for an existing Repository CR has been deleted, or you want to add a new webhook to your project settings, use the tkn pac webhook add command. This command adds a webhook to the project repository settings and updates the webhook.secret key in the existing secret without modifying the Repository CR.
Below is the sample format for tkn pac webhook add
$ tkn pac webhook add -n repo-pipelines

✓ Setting up Bitbucket Webhook for Repository https://bitbucket.org/workspace/repo
? Please enter your Bitbucket Cloud Atlassian account email:  <[email protected]>
👀 I have detected a controller url: https://pipelines-as-code-controller-openshift-pipelines.apps.awscl2.aws.ospqa.com
? Do you want me to use it? Yes
✓ Webhook has been created on repository workspace/repo
🔑 Secret workspace-repo has been updated with webhook secret in the repo-pipelines namespace.Repository exists in a namespace other than the default namespace, use tkn pac webhook add [-n namespace].
In the above example, the Repository exists in the repo-pipelines namespace rather than the default namespace, so the webhook was added in the repo-pipelines namespace.Update Token
There are two ways to update the provider token for an existing Repository CR.
Update using the CLI
Use the tkn pac webhook update-token command to
update the provider token for an existing Repository CR. For Bitbucket Cloud,
the command also prompts for your Atlassian account email and updates the
git_provider.user field in the Repository CR.
Below is the sample format for tkn pac webhook update-token
$ tkn pac webhook update-token -n repo-pipelines

? Please enter your Bitbucket Cloud API token:  ************************************
? Please enter your Bitbucket Cloud Atlassian account email: ([email protected]) [email protected]
🔑 Secret workspace-repo has been updated with new Bitbucket Cloud API token and account email in the repo-pipelines namespace.Repository exists in a namespace other than the default namespace, use tkn pac webhook update-token [-n namespace].
In the above example, the Repository exists in the repo-pipelines namespace rather than the default namespace, so the webhook token was updated in the repo-pipelines namespace.Update using kubectl
When you have regenerated an API token, you must update it in the cluster. You can find the secret name in the Repository CR:
spec:
  git_provider:
    secret:
      name: "bitbucket-cloud-token"
Replace $api_token and $target_namespace with your values:
kubectl -n $target_namespace patch secret bitbucket-cloud-token -p "{\"data\": {\"provider.token\": \"$(echo -n $api_token|base64 -w0)\"}}"If your git_provider.user field needs to be updated, patch the Repository CR
as well:
kubectl -n $target_namespace patch repository my-repo --type merge \
  -p '{"spec":{"git_provider":{"user":"your_atlassian_account_email"}}}'